Overview
In this tutorial we will be going over how to:
- Install Libfreenect drivers libraries for the Kinect 2 on Ubuntu 20.04
- Use Python 3 to interface with the Kinect 2
- Configure CUDA to work with the drivers
Introduction
The Kinect 2 offers the ability to perform interesting computer vision (CV) tasks at a low cost (typically $30-$40 used at your local game store). It is capable of performing depth imaging, gesture recognition, and joint tracking. To gain access to all of these features on Linux, however, it’ll take a bit of tinkering as Microsoft built the Kinect 2 with the Xbox One and Windows in mind.
Fortunately, the community at OpenKinect have created open source drivers for us. The drivers gives us access to the RGB and Depth functionalities of the Kinect 2. It does not, however, give us access to the gesture recognition and join tracking functionalities. If the natural-user-interface (NUI) features interest you, I recommend looking into OpenNI2 and NiTE2.2. At first glance, this guide might deem helpful, but I cannot confirm it’ll work on Ubuntu 20.04 LTS. For now, this tutorial will only cover the installation of the Libfreenect drivers.
Prerequisites
- Kinect 2
- Ubuntu 20.04 LTS
- Git
Hardware Tested
The following tutorial was tested on the following hardware:
- Nvidia GeForce GTX 1060 6GB
- Intel i5-6500 @ 3.600GHz
Instructions
1. Install Nvidia Drivers (optional)
If you’d like leverage your GPU, make sure the GPU’s drivers are installed. If you do not have them installed, perform the following:
- Navigate to the “Software & Updates” application
- Click the “Additional Drivers” tab
- Select a GPU driver under NVIDIA Corporation (the higher the number, the more recent the driver)
2. Install Build Tools and Libraries
Install the following build tools and libraries
1
2
3
4
5
6
sudo apt-get install build-essential cmake pkg-config  -y  # Build tools
sudo apt-get install libusb-1.0-0-dev          # libusb
sudo apt-get install libturbojpeg0-dev -y      # TurboJPEG
sudo apt-get install libglfw3-dev -y           # OpenGL
sudo apt-get install libva-dev libjpeg-dev -y  # VAAPI for Intel only
sudo apt-get install libopenni2-dev -y         # OpenNI2
3. Install CUDA (optional)
Install CUDA if you wish to use it on your NVIDIA Graphics card.
First, install the CUDA Toolkit
1
apt-get install cuda-toolkit -y
Next, install the CUDA code samples. These are required by the Libfreenect installation. The CUDA Samples are bundled with the the CUDA toolkit installation bundle on their website. Since we utilized apt to install the toolkit, the samples are missing. We can fix this by running the CUDA installation runfile and selecting to install ONLY the samples.
We can do this by first downloading the runfile.
1
wget http://developer.download.nvidia.com/compute/cuda/10.1/Prod/local_installers/cuda_10.1.243_418.87.00_linux.run
Run the runfile as sudo.
1
sudo sh cuda_10.1.243_418.87.00_linux.run
A terminal-based GUI will appear. It may state that CUDA drivers are already installed. Just proceed, we are not installing drivers. Usinf the arrow keys to navigate, perform the following:
- Type “accept” to accept the EULA
- Uncheck Driver, CUDA Toolkit 10.1, CUDA Demo Suite 10.1. CUDA Documentation 10.1 (only CUDA Samples 10.1 should be checked)
- Hover over “Install” and hit your
Enterkey
By default the samples should install in your home directory.
Once the samples are installed, we need to update our CPATH so Libfreenect know where to look for them. In your file ~/.bashrc type:
1
export CPATH=$CPATH:$HOME/NVIDIA_CUDA-10.1_Samples/common/inc
Save the file and run the command:
1
source $HOME/.bashrc
4. Build Libfreenect 2
Clone the library and navigate into it.
1
2
git clone https://github.com/OpenKinect/libfreenect2.git
cd libfreenect2
Then run the following commands to build the drivers.
1
2
3
4
mkdir build && cd build
cmake .. -DCMAKE_INSTALL_PREFIX=$HOME/freenect2
make
make install
Set up udev rules for device access.
1
sudo cp ../platform/linux/udev/90-kinect2.rules /etc/udev/rules.d/
Finally, replug the Kinect and run the test program. The test program can be found in the compiled project’s bin folder of the repository.
1
./bin/Protonect
The output should be a video stream that looks something like this:

5. Python Bindings
We will be installing one of the many Python bindings for Libfreenect. This one is named Freenect2 and you can find its API here. To use the bindings, first create a project directory.
1
2
mkdir freenect2-test
cd freenect2-test
Next, set up and activate a virtual environment. In my opinion, this should be standard in your Python workflow as it allows you to work seamlessly with multiple package versions and it prevents you from polluting your main Python installation. You can skip this step if you are uncomfortable using virtual environments.
Create & activate the virtual environment (optional).
1
2
3
sudo apt install python3-venv -y
python3 -m venv .venv
source .venv/bin/activate
You can later exit the virtual environment with the command
1
deactivate
Proceed to install the following tools and the Libfreenect2 Python bindings module, Freenect2
1
2
3
sudo apt install pcl-tools -y
pip install wheel
PKG_CONFIG_PATH=$HOME/freenect2/lib/pkgconfig pip install freenect2
You can test the installation by fetching a sample program and running it with the following commands:
1
2
3
wget https://raw.githubusercontent.com/rjw57/freenect2-python/master/examples/dump_pcd.py
python dump_pcd.py
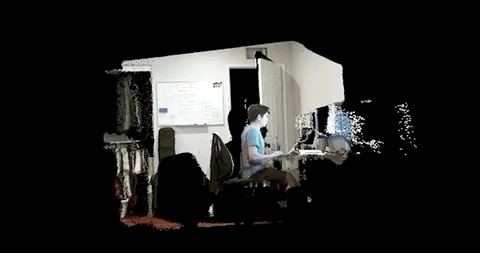
pcl_viewer output.pcd
The output should resemble this:
5.1 Alternative Python Bindings
There are multiple python bindings out there. Another one is Pylibfreenect2. They both accomplish the same thing, but use a slightly different API. You can view the API for Pylibfreenect2 here and decide which one you like better.
Create and activate a virtual environment (optional)
1
2
python3 -m venv .venv
source .venv/bin/activate
Install the dependencies and Pylibfreenect2
1
2
3
4
pip install wheel
pip install numpy
pip install cython
pip install pylibfreenect2
Run a sample program
1
2
3
pip install opencv-python
wget https://raw.githubusercontent.com/r9y9/pylibfreenect2/master/examples/multiframe_listener.py
LIBFREENECT2_INSTALL_PREFIX=$HOME LD_LIBRARY_PATH=$HOME/freenect2/lib python multiframe_listener.py
You should see a video feed output similar to the one when running Protonect.